Saturday, 29 May 2010

Working with Collections

By using Collections within VBA you can store multiple objects, similar to an array.  The key advantage with Collections is that the objects can be added, removed and used by referring to the objects ‘Key’, rather then having to loop through an array.

In this blog post I am going to use the example code provided in my previous blog post Working with Class Modules.

Within the class module cls_Employee we have the following properties, Name, Department, Age and Salary.  In this blog post I will run though how to create multiple employee class objects and add them to a collection.  We will then loop through the collection and retrieve and remove an employee.

To store multiple instances of a class, in this example a group of employees, create several instances of the class and load them to a collection as follows.

    Dim clsEmp As cls_Employee
    Dim colEmp As Collection

    Set colEmp = New Collection

    ' Loop through your existing list
    For Each Item In SomeList

        ' Create a new instance of the employee class
        clsEmp = New cls_Employee

        ' Set the properties of the class
        ' As per the example in the previous blog post

        'Load the class to the collection, _
         using the employee's name as the 'key'

        colEmp.Add clsEmp, clsEmp.Name

    Next Item

Now, you can use a simple For Each loop to loop through the collection and iterate through the collection and access each instance of cls_Employee sequentially:

    Dim clsEmp As cls_Employee
    ' Loop through a collection to retrieve each item
    For Each clsEmp In colEmp
        Debug.Print clsEmp.Name
        Debug.Print clsEmp.Dept
        Debug.Print clsEmp.Age
        Debug.Print clsEmp.Salary
    Next clsEmp

To retrieve or remove a specific employee you can use the object’s ‘key’ to refer to it.

    ' Use the key to retrieve a specific employee
    Dim clsEmp As cls_Employee
    clsEmp = colEmp("Fred Smith")

    ' Use the key to remove a specific employee
    Dim clsEmp As cls_Employee
    colEmp.Remove "Fred Smith"

Something worth noting is that the key needs to be a text value.  Other values can be used but may require the Str() function wrapped around them.

Friday, 28 May 2010

Excel Picture Quiz 3

Right, so finally to stage 3, adding the counter and locking the cells. First choose where you are going to put the counter, and use the following formula;

=countif(B5:J17, "correct")

Again changing the italicised bits to fit your quiz;

B5:j17 - the range of cells where the answers are marked
correct - or whatever you have set your quiz to say for correct answers


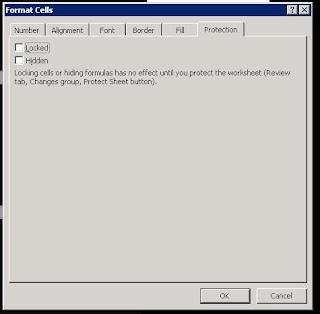
The final stage is to set the cells you want people to put their answers into as unlocked so we can protect the sheet and stop anyone from checking the formulas to get the answers.

To do this either select all the answer cells using the control button, or one at a time right click and select properties, and uncheck the locked setting under protection


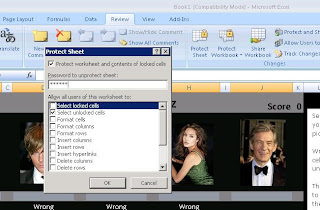
Finally protect the sheet; select 'Protect Sheet' from the Review ribbon, you can set a password if you wish. This will mean you can only select the cells we set as unlocked.

Once you have selected ok your quiz is finished.

I'll upload a copy of my incomplete version here for anyone to play with, please let me know if you have any hints or tips to make this better.

Thanks
Dan

Working with Class Modules

I’d been working with Excel and VBA for more then 6 years before I caught on to just how useful class modules can be.  Class modules can be a powerful tool used within intermediate to advanced level VBA programming.  Below is something I hope you will find a useful introduction to how to use them.

This example does assume some basic knowledge of the VBE (Visual Basic Editor).

We’ll start where almost all examples for class modules start; with an employee, the employee is called Fred Smith (original, I know), works in accounts, is 25 and earns £22k.

To start, add a new class module to your VBA project.  For this example change the name from Class1 to cls_Employee.  Do this by editing the (Name) item in the ‘Properties’ list for the class module.

You then need to create the variables which are going to be used within the class module, since they are declared Private, they are not available outside of the class module.

Option Explicit

Private strName As String
Private strDept As String
Private lngAge As Long
Private dblSalary As Double

Now we need to add the property procedures which allow us to write to and read from the above variables.  To do this we need Property Get and Property Let functions.  (Property Set is used for objects).

' Name property
Public Property Get Name() As String
    Name = strName
End Property
Public Property Let Name(value As String)
    strName = value
End Property

' Department property
Public Property Get Dept() As String
    Dept = strDept
End Property
Public Property Let Dept(value As String)
    strDept = value
End Property

' Age property
Public Property Get Age() As Long
    Age = lngAge
End Property
Public Property Let Age(value As Long)
    lngAge = value
End Property

' Salary property
Public Property Get Salary() As String
    Salary = dblSalary
End Property
Public Property Let Salary(value As String)
    dblSalary = value
End Property

The Let procedure is used to assign values to the class. The get procedure is used to get the values from the class.  Please note that the data types must be the same for the ‘value’ be passed through and the Get procedure.

A property can be made read-only simply by omitting the Let procedure. For example, a read-only property might be tax, which is calculated when it is called. E.g.,

'Tax property
Public Property Get Tax() As Double
    Tax = Calculate value
End Property

Class modules can also contain sub routines and functions, such as the PrintEmployeeData below.

' Print employee data routine
Public Sub PrintEmployeeData()
    ' You code appears here
End Sub

Now that we have the class module ready we can create objects based on the class module.  Add a standard code module to your project.  Within a new sub routine declare a new variable as type cls_Employee like the example below.

Option Explicit

Sub AddEmployee()
    Dim clsEmp As cls_Employee

End Sub

ClsEmp has to be set as a new instance of the the class before we can assign values to it’s properties, like below.

    Set clsEmp = New cls_Employee
    clsEmp.Name = "Fred Smith"
    clsEmp.Dept = "Accounts"
    clsEmp.Age = 22 
    clsEmp.Salary = 25000

You can retrieve the data value from the class using code similar to the below example.

    MsgBox "Employee Name: " & clsEmp.Name;

I hope this has helped with your understanding of class modules within VBA.  The above example code will work in Excel and Access.

I would like to add that this blog post and code examples, although my own, is based a on the article from which I learned about class modules.  That article can be found at Chip Pearson’s website: http://www.cpearson.com/

In my next blog post I will cover how to store multiple objects (employees) in a collection.